With this DIY, you can quickly bring autumn spirit into your home! Whether as a gift for your loved ones or for yourself - you can easily personalize the leaf bowl with your favorite colors and your own design. You will need these materials for the DIY:
- Self-drying clay
- Leaves – e.g. from a hydrangea
- Watercolor paints and brushes
- Gloss varnish for sealing
- Knife
- Rolling pin

Materials for the DIY leaf bowls
First of all, we need leaves to form the bowl. We used hydrangea leaves because they have a nice oval shape, but of course other leaves will work too. So feel free to experiment and if you don't like the shape, you can just roll over the clay again and start over.
Once you have your leaves, cut some clay and roll it out with a rolling pin (the clay should be larger than the leaf). Next, take a leaf and place it on the clay. Then roll the rolling pin over the leaf again to print as much detail as possible onto the clay. Peel the leaf off again and check if you are happy with the result. Then take a knife and cut along the outer line of the leaf.

Step-by-step to the leaf bowl
Remove the remaining clay and you should now have a leaf made of clay in front of you! Now you can change the shape a little so that the bowl can hold your treasures really well. Use your fingertips and carefully roll up the edges of the leaf. Tip: If the clay is too dry, use a little water to shape it better and smooth the edges better. You can make the waves as big or small as you like. In the end, your leaf should look something like a dry, crisp leaf!

Shape the leaf to your liking!
If you like the shape, the clay needs to dry next. It's best to place the bowls on a baking rack so that the clay is exposed to air on both sides and can dry properly. If you don't have a baking rack to hand, you can leave them to dry as they are, but it's best to turn the bowls over after 24 hours so that both sides have time to dry. After 48 hours, the clay should be completely dry and hard.

Give the clay time to dry
Time to get out the brushes! Before you start, cover your table with old newspaper or something similar if you want to avoid stains. Then choose your favorite watercolor paints and paint your leaves on all sides and corners. Depending on the color you chose, you may need two or three coats to paint over the color of the clay. Finally, seal the leaves with a gloss varnish.

Paint your leaf bowls!
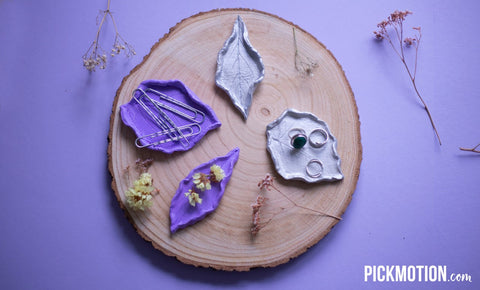
Now all that's left is for the paint to dry and your DIY leaf bowl is ready! Now it can hold your jewelry, office supplies or other small treasures on your desk in style. Of course, the bowl also makes a great gift for family or friends who love autumn as much as you do! Autumn vibes here we come!

Your DIY leaf bowl is finished!