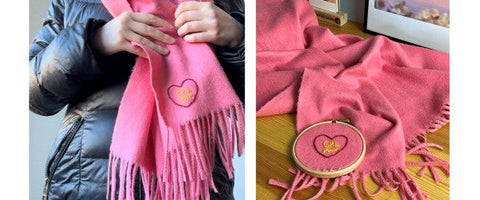
Embroidery is back in fashion and not as difficult as you might think! For our tutorial, you only need to know one basic embroidery stitch (the split backstitch) and you can start with your design. For the heart with the lettering GRL PWR, you need the following materials:
- Embroidery frame
- needle
- Pen
- Embroidery thread (in colors of your choice)
- Scissors
- Fabric for embroidery

Take the fabric you want to embroider and grab a pen to transfer your design onto the fabric. We recommend using a pen that can be washed out or removed later. For example, use a hard pencil, a water-soluble pen, heat pen or fabric chalk. When you are happy with the design, use the embroidery hoop to stretch the fabric. An embroidery hoop consists of two rings - the inner ring goes under the fabric and the outer ring is clamped on top. You can use the screw on the embroidery hoop to tighten the rings so that nothing slips while you embroider.

Next, choose an embroidery thread in the color of your choice and you can start embroidering! Cut a long thread from your thread and thread it through your embroidery needle. Tie a knot at the other end of the thread so that it doesn't just come through the fabric. Go under the fabric with the needle and pierce upwards through the beginning of your template. Pull the entire thread through to the knot and then go back a few millimeters with the needle (always along your template) and through the fabric again from above. The first backstitch is finished!
Next, bring the thread up again about one stitch length above your first stitch. For the split backstitch, place the needle in the middle of the thread from the previous stitch and go back through the fabric. This creates a beautiful braided look.

Continue embroidering along your template until you're finished. At the end, you can sew the thread on the back or tie a knot so that nothing comes apart. Decide for yourself whether you want to embroider everything in one color or several colors. If you're happy with the result and everything is sewn or knotted well, you can remove the embroidery frame and you're done! If there are still remnants of your template visible, you can remove them now and you can give the embroidered fabric as a gift or wear it yourself with great pride!

We hope you liked our little tutorial and that you give it a try yourself! Share your embroidery with us on Instagram using the hashtag #pickmotion. We look forward to it!