DIY Easter Bunny Napkins
Perfect for Easter brunch or for a feast in the evening! All you need are a few napkins and Easter eggs and in no time at all you can make a great (and practical) decoration for Easter. You will need:
- Square cloth napkins
- One string per napkin
- one Easter egg per napkin
- optional: some short bushes of dried flowers as decoration
Unfold the napkin and place one point in front of you. Fold the napkin once in the middle to form a triangle. Fold the napkin up again from the bottom point and repeat the step until you only have a thin strip in front of you. Place the Easter egg in the middle and lift the two ends of the napkin up - these are the ears! Wrap a string directly over the "head" of the egg to tie the napkin ears in place. The Easter bunny napkin is ready!

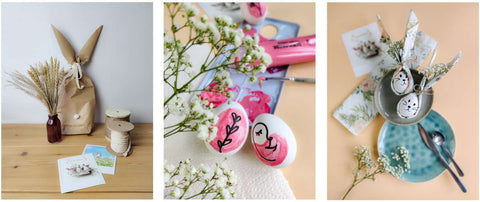
Step-by-step instructions for the napkins
If you like, you can put short bunches of dried flowers (or fresh flowers) between the ears to give the eggs an extra dose of springtime! You can of course drape both "real" Easter eggs for eating and decorative eggs in the napkins. Place them directly on the plate or spread out in the middle of the table and you've created a super cute table decoration for Easter!

The Easter bunny napkins are ready!
Easter eggs with lineart
A popular trend in Easter egg painting is drawings in the lineart style. The eggs look like small works of art without much effort! All you need is:
- Eggs (either decorative eggs or boiled eggs)
- some acrylic paint & brush
- a marker ·
When choosing colors, you can go according to your personal taste. From pastel spring colors to bold opaque colors, everything is allowed. As a background for your lineart, choose a color and paint a circle, oval or other shape onto your egg. Let the paint dry well and then grab a permanent marker. Black is common for lineart, but here too you can of course choose a color that you like best. Now use the permanent marker to paint simple patterns, such as small branches with leaves, delicate flowers or abstract faces. There shouldn't be too many details and they should look more minimalist. Your trendy Easter eggs are ready!

DIY Easter eggs with lineart
An Easter bunny as a gift bag
If you have prepared a small gift for Easter, it is also super easy to wrap it in the shape of an Easter bunny! This idea is also easy to recreate and will bring a lot of joy when giving it as a gift and unwrapping it. You will need:
- Brown wrapping paper
- a pair of scissors
- a pen
- a ribbon or string
- Glue stick & adhesive tape
- optional: a cotton ball & pens for painting
Cut the paper out in a rectangular shape and lay it out in front of you. Fold one long side into the middle of the paper and use the glue stick to spread a strip of glue along the edge. Fold the opposite side of the paper onto the adhesive strip and press the paper together to make sure it stays in place. Now fold the bottom end of the paper up about a quarter of the way. Press the insides to form a square. Now fold the top and bottom edges of the square into the middle and hold them in place with some tape. Now you have the basic packaging! Now draw the bunny ears on the top end of the paper with a pen and cut away the area between the ears. Your Easter bag is ready!

Step-by-step instructions for Easter bags
You can leave the front and back as they are or decorate them further: e.g. with a painted rabbit face or a glued-on cotton ball as a rabbit tail! Then pull your Easter bag open by the ears and hide your present, some Easter chocolate, a postcard, magnets or other small items inside. As soon as your gift bag is full, you can tie it together at the ears with a gift ribbon. Your cute rabbit gift wrapping is ready!

DIY Easter gift bag
You can find lots of beautiful postcards in our shop to match the Easter holiday! Perfect for sending but also as spring decorations at home! If you make something from this post, show us your work on Instagram and tag us with #pickmotiondiy !