Monstera
The Monstera - also known as the Swiss cheese plant - is currently the trendiest plant and should not be missing in any urban jungle. This beautiful houseplant is very easy to propagate, so that one plant soon becomes many. We will explain the most important steps to you.
You need:
- A Monstera
- A vase or vessel with fresh water
- A sharp knife
- Disinfectants
- Spray bottle with water
To propagate a Monstera, carefully cut off healthy head or stem cuttings and then root them in water and later in soil. The best time of year for propagation is early summer, because that is when the plants have particularly strong growth power.

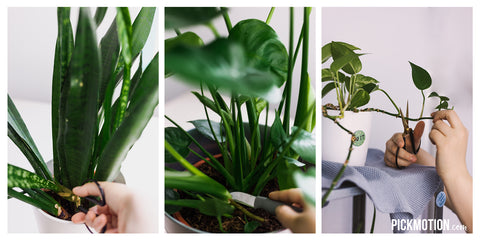
To avoid bacteria from getting on the plants, you should cut with a sharp, clean knife or scissors that have been disinfected beforehand. Find a cutting that is at least 20cm long and has at least two leaves and an aerial root. To cut, start under a shoot node and be careful not to damage the aerial root, as this is important for the green plant's nutrient collection. Let the cut cutting dry in an airy place for at least an hour to prevent rot.
As soon as the cut has dried well, prepare a large glass or vase with water at room temperature and with as little lime as possible. Simply place the Monstera cutting with the aerial root in the water and place the green plant in a bright (but not too sunny) and warm place. The ideal temperature is 25°C. If the plant is in full sun, try to put it in the shade. The Monstera likes high humidity, so it is a good idea to spray the leaves regularly with a little water. The cutting's water should be changed every two to three days and after four to six weeks the new roots should be clearly visible! When the new roots are about 10cm long, the Monstera cutting can be transplanted into a pot with permeable and humus-rich houseplant soil. A wonderful gift is ready! Our folding cards from the "Flowers as a thank you" set are perfect for this!

Pothos
The ivy plant is a pretty climbing plant that is also ideal as a hanging plant. Good to know: The ivy plant is a real feel-good plant because it absorbs toxins from the air around it! It is particularly resistant to cigarette smoke and exhaust fumes because it absorbs the toxins in its leaves. This makes it a real air freshener! However, a large number of plants are needed to noticeably improve the indoor climate - it's a good thing that it can be propagated very easily!
You need:
- A ivy plant
- A sharp, clean pair of scissors
- A vase with fresh water
- Disinfectants

To propagate the ivy plant, you need to cut individual shoots with sharp, clean (and preferably disinfected) scissors and place them in a glass of water. The shoot should have at least two aerial roots. Make sure that at least one node is in the water, as this is where most of the roots will form.
As soon as the roots are about two centimeters long, the cutting can be planted in soil. If you want a nice, dense plant, it's best to plant several cuttings together in one pot. A new climbing plant will grow! Our "A Flower A Day" card set is ideal as a small gift to accompany the plant and the gift!
Bow hemp
The snake plant is an easy-care plant and looks very pretty too. With a little patience, the plant can be easily propagated using leaf cuttings. Please note: The method we are introducing here only works with the green Sansevieria species, otherwise the patterns will disappear on others.
You need:
- A bow hemp
- A sharp, clean pair of scissors
- Cactus or succulent soil
- One large or several small vases
- Spray bottles with water
- Disinfectants

If you want to make lots of leaves from one leaf, make small leaf cuttings. To do this, take a large leaf from the outside and cut it off as far down as possible at the base using sharp, clean and disinfected scissors. You can now make several cuttings and young plants from this one leaf! When planting, it is important to stick the underside of the leaf - the one that was previously facing the ground - into the soil. A tip: cut the underside of the cutting as straight as possible and cut the top diagonally. This way you know that the straight side has to go in the soil. The leaf cuttings should be at least 4-5cm long. Here, too, it is important to let the bow hemp cuttings dry out in the open first. Simply lay them down for two or three days and wait.
Take a large vase for all the cuttings or several small ones for each leaf cutting and fill them with succulent soil. Press the soil down a little from above with your hand and stick the bottom of your leaf cutting about 2cm deep into the soil. It is important that they are firmly planted in the soil and do not tip over. Finally, spray the plants with a spray bottle full of water. Since the bow hemp is a succulent, the soil should not be too moist. The surface of the soil substrate can dry out now and again. It is best not to place the bow hemp in direct sunlight, but still in a bright place.

Now you have to be patient! It usually takes several months for new young plants to sprout, but the wait is worth it and they make a lovely gift!

We hope you enjoyed our little tutorials for plant cuttings! With a nice card, the plants make a great gift for the inauguration of a new apartment or just because! So be sure to check out our online shop for our Pickmotion cards and other beautiful gifts!


