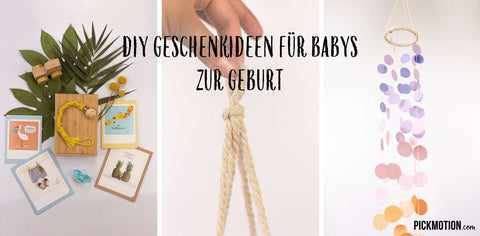
Macrame baby pacifier chain
A pacifier chain is not only an incredibly practical gift for babies, but can also be a beautiful accessory - especially if it is handmade with love! We present a super simple guide on how to make a dreamy pacifier chain with a little manual skill using the macrame knotting technique!
For this project you need:
- 2 x 1.2 cm macrame cord, 3 mm thick
- Pacifier clip
- dummy
- ruler
- Scissors
- Maybe something to color it with, e.g. turmeric as a natural colorant

If you have bought white string and want to add a little more color, you can do it easily with natural means. For a beautiful, strong yellow, turmeric powder is perfect. To do this, simply sprinkle some of the spice into a bowl, pour some hot water over it and stir everything gently with a spoon. Now dip the string in the hot water and let it rest there for about 10 minutes. Then fork the string out again, let it dry on a cloth and voilà - the string is colored!

Now it's time to tie and knot! The pacifier chain is tied in a very simple pattern. The following macrame techniques are used: lark's button knot, square knot and wrap knot. Don't worry, we'll explain to you step by step how these knots work!
Start by attaching two cords to the pacifier clip using a lark's head knot . You make a lark's button knot by making a loop in the middle of a cord so that two ends of the cord are pointing downwards. Pull the loop through the hole in the clip and pull the ends of the cord into the hole in the loop. The lark's button knot is finished! Repeat the step with a second cord.
There should now be four loose threads dangling from the clip, which are then linked together using square knots . For the square knot you need four threads lying next to each other, two from each knot. The middle two threads always remain taut and you work with the two bands hanging on the outside. The left thread is laid across the two middle threads and under the right cord. The right thread then goes under the two middle threads and is then pulled through the loop between the first two cords so that it lies over the left thread. Then pull on the two outer threads so that the knot is pulled tight up to the end. Now repeat the step from the right side: over the two middle threads and under the left thread. The left band goes under the two middle cords and over the right thread. This is how the square knot is created! Repeat these steps until you have reached your desired length, but make sure that the chain is not too long, because if it is over 22cm long there is a risk of strangulation. Our pacifier chain is about 11cm long.

Now take the longest thread and place it twice in a loop. Tie this in a double knot just below the last square knot so that the loop is well secured. After that, you should have a loop and a loose end pointing upwards. Take the other long thread and wrap it around all the threads a few times. Make sure that the end of the loop is sticking out at the top. Do this until you are happy with the length. Put the end of the thread in the loop and then pull really hard on the end of the loop so that the knot is nice and tight - the wrap knot is done! Cut the fringes straight and make sure not to cut the loop. Then put the loop in the ring of the pacifier and pull the loop over the clip and all the way along the chain back to the pacifier to tie it. Done!

And the pacifier chain is ready! A lovely gift for your own baby or for the next baby party. To match this, we have our folding card sets " Welcome little baby " or " For the birth " with which you can wish the new little person all the best in the world.

Ombre Mobile
A beautiful mobile decorates the children's room and is also a fascinating and fun sight for the baby. Instead of spending a lot of money on it, you can easily make a mobile yourself - a great gift for children and parents! Our DIY idea has a total length of about 1.2 meters and can of course be designed as desired with your favorite colors!
For this project you need:
- 8 thin cords, about 90cm long
- a ring with a diameter of 14 cm
- colored paper
- Pencil
- Circle
- ruler
- Scissors
- Glue

For a flowing color gradient in the spirit of the ombré look, you need strong, colored paper in different colors. Cut out circles in three different sizes - it's best to use a compass to mark them so that you can then easily cut out the circles along the line. For our mobile, we cut out 32 large circles per color, 40 medium circles per color, and 24 small circles per color. Then arrange the individual cords and sort the circles by color and size before placing them on the thread and sticking them on. We recommend double-sided tape so that the thread only needs to be stuck on one side.

For the ring, you can use a simple wooden circle or wrap a ring with some cord. Take two cords and attach them firmly to the ring and with a loop at the intersection so that the mobile can be hung up easily. Now attach the cords to the paper circles. Your own mobile is ready!

We hope you like our DIY gift ideas and that we have motivated and inspired you to get your hands dirty with your next baby gift! For matching cards and other sweet gifts, take a look at our PICKMOTION online shop - there we have a selection of many beautiful cards (and magnets !) for birth.